Why?
For my latest project, I wanted to get away from the bustling modern world of JS (meta) frameworks and return to the basics. Since I just started learning web development over a year ago, I’ve only been learning abstractions based on any given UI framework. But I wanted to know if there is a simpler way to understand and make small web applications? Here are my notes on how to make a small web application from start to finish!
What are we building?
Robin is a project time tracker, inspired by Watson CLI tool. A user can create projects and simply clock in and clock out of a session. All sessions are counted to get a total time spent doing projects. The front end will allow for simple CRUD actions to manage the data.
The Stack
Robin will be a Node.js (Node) web application, built with Hono as our server framework. Deployed on Railway alongside a PostgreSQL database. The database is managed and query using Drizzle ORM. We will be setting up the project so that we can create a front-end website using tsx components with HTMX for a future follow-up blog.
If you want to see the codebase, check out the annotated Github repository and give it a star if you found it useful!
How does it work?
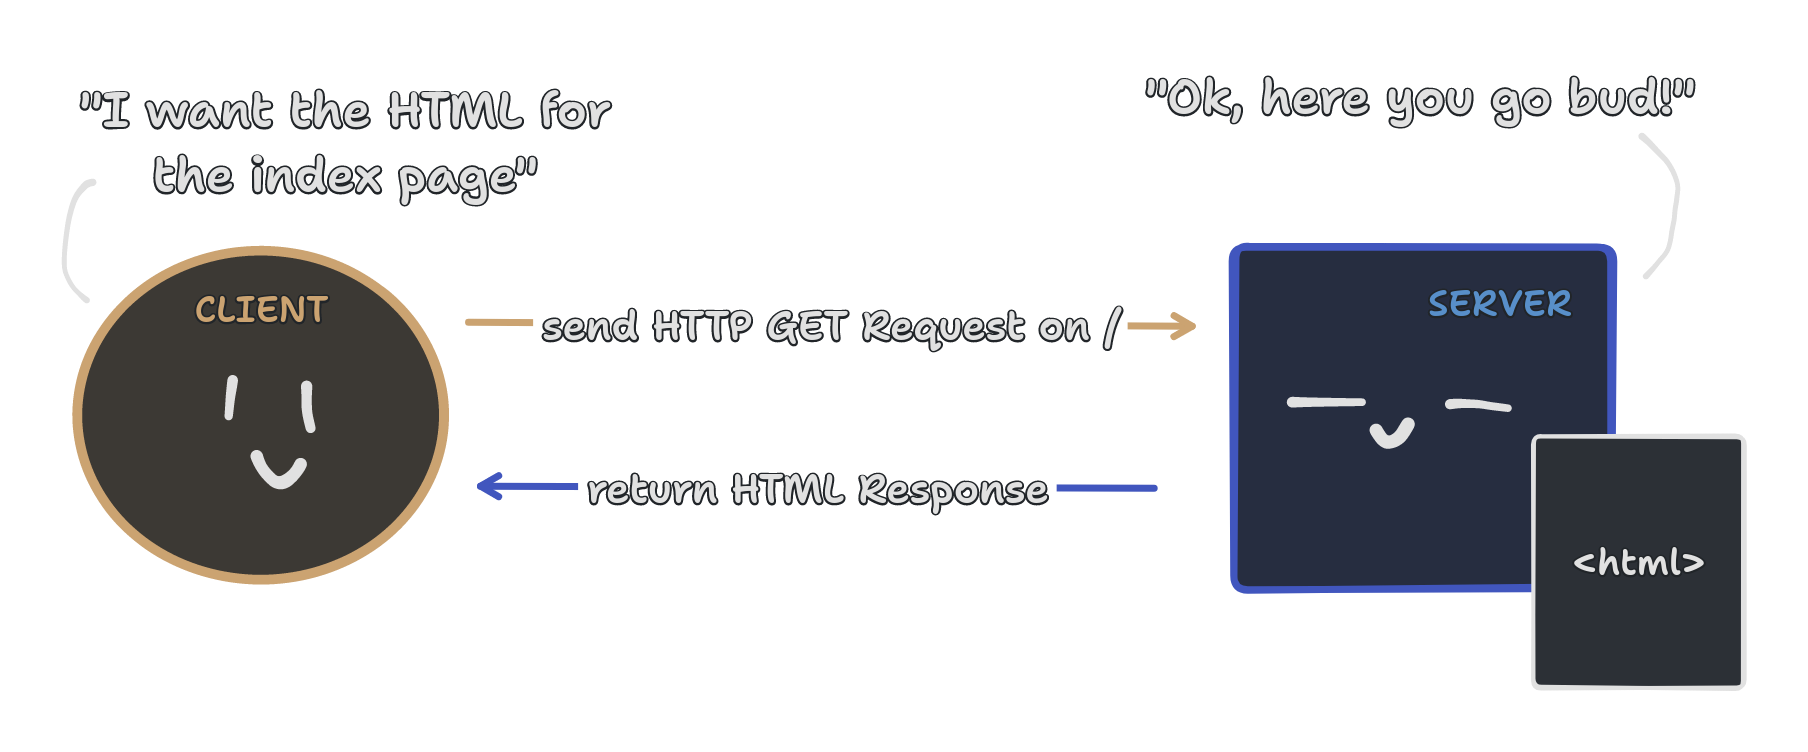
Before writing any code, I think we should take a step back and check how websites work. When someone goes to a URL, the browser makes an HTTP GET request to the index endpoint. Endpoints are how clients, like our browser, can interact and tell the server to do things. In this case, the server starts turning the TSX template we wrote into HTML and returns it back with any Javascript to the browser. The browser then takes the HTML and JS to render the page so the user can look and interact with it.
To put it in other words, we deal with a client making an HTTP request to the server that responds back with data we can parse and use. We can put all of our pages and CRUD actions into server endpoints that we can interact with.
Author’s Note
This blog assumes NOTHING of the reader. That means that this blog will have sections setting up the project in painfully detailed step-by-step instructions. However, I will not be going over installing terminal commands like npm/pnpm , tsc , git, gh, etc. I will try my darnedest not to be sidetracked, and keep my focus on creating and deploying a Node.js web application, but no promises.
Installation
Here’s how to get started (using a terminal):
- Create a new folder (
mkdir robin-tutorial) and go inside it (cd robin-tutorial) - We’ll start a new Node project by using
pnpm init, which should generate apackage.jsonfile.- For this tutorial, we will be using
pnpm, butnpmshould be similar (pnpm init=npm init,pnpm add=npm install, etc.)
- For this tutorial, we will be using
- From here we have to install our packages, which in our case are:
- Hono (our server framework):
pnpm add hono @hono/node-server - Dotenv (to access our
.envvariables):pnpm add dotenv - Drizzle ORM (to manipulate our database):
pnpm add drizzle-orm pg&pnpm add -D drizzle-kit @types/pg - TSX (our HTML templates in TS):
pnpm add -D tsx
- Hono (our server framework):
- Before moving on, you can look inside the folder to ensure that we have a
node_modulesfolder,package.jsonfile (which we change in a moment), and apnpm-lock.yamlfile (I assume this sets the packages’ version). - To setup TSX, run
tsc --initto create atsconfig.jsonthat we will edit to ensure the following properties are not commented. Use a text editor to recreate the following:
{
	"compilerOptions": {
		"target": "es2016",
		"jsx": "react-jsx",
		// some stuff...
		"jsxImportSource": "hono/jsx",

		// some stuff...
		// the following are already set by `tsc --init`, but make sure anyway!
		"module": "commonjs",
		"esModuleInterop": true,
		"forceConsistentCasingInFileNames": true,
		"strict": true,
		"skipLibCheck": true
	}
}- Afterwards, let’s add a new
srcfolder with our files inside:index.tsx(our app’s entry point),components.tsx(our JSX templates), andschema.ts(used to model our database with Drizzle). - Lastly, let’s modify our
package.jsonand change our main file and add scripts to run our application, including some for using Drizzle (will be explained later):
{
	// ...
	"main": "src/index.tsx",
	"scripts": {
		"start": "tsx src/index.tsx",

		// for drizzle, will be used later
		"generate": "drizzle-kit generate:pg",
		"migrate": "drizzle-kit migrate:pg"
	},
	// ...
}
Did you know Hono means ‘Fire’ in Japanese?
Hono is a Node server framework which makes coding endpoints easy. Other similar frameworks would be Elysia, Fastify, and Express.
To start our project, start by creating a new Hono object and subsequently call functions with the appropriate HTTP request and endpoint. Afterwards export and serve the web app. This will be inside our index.tsx file.
// index.tsx
// ---------------------------------------

/* 🪂 Import packages (installed via npm/pnpm) */

// Hono packages
import { Hono } from 'hono';
import { serve } from "@hono/node-server";

// loads environment variables from `.env`, will be used later
import * as dotenv from "dotenv";
dotenv.config();

// ---------------------------------------

/* 🏗️ Configure Hono Web Application */

// initialize web application
const app = new Hono();

// ---------------------------------------

/* 🛣️ Route Endpoints */

// GET index page
app.get("/", async (c) => {
	// return HTML response
	return c.html(
		<h1>Hello world!</h1>
	);
});

export default app;

// ---------------------------------------

/* 🚀 Deployment */

// use `.env` set PORT, for Railway deployment
const PORT = Number(process.env.PORT) || 3000;

// become a server, to deploy as Node.js app on Railway
serve({
	fetch: app.fetch,
	port: PORT
});

// ---------------------------------------
Now going back to the terminal, we can run our web application by using the start script from the package.json file that we set up earlier: pnpm run start. Use the browser and go to [http://localhost:3000](http://localhost:3000) and you should be greeted with a big bold “Hello world!”
Database Setup with Drizzle (fo’ shizzle)
Now that we have the basic web application setup, let’s move our focus onto the database that we’ll use for our time tracking functions. Drizzle ORM (Object-Relational Mapping) is a library to manage and communicate with the database via Typescript (TS) code. We can use the ORM to create the source of truth for the database’s schema. Let’s set it (and our hosted DB) up!
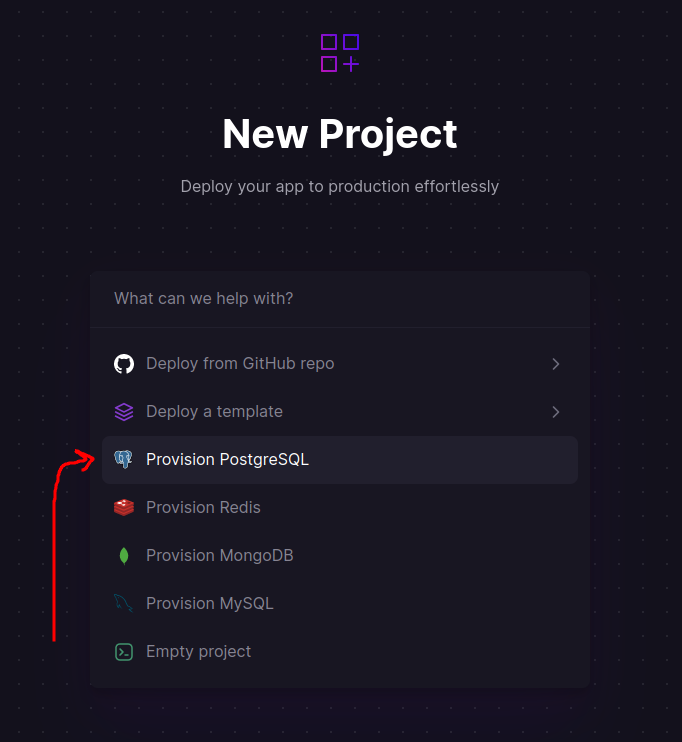
- Provision a new PostgreSQL (postgres) database on Railway by creating a new project.
- Once deployed, go to the Variables tab on the postgres service and copy the
DATABASE_URLvalue…
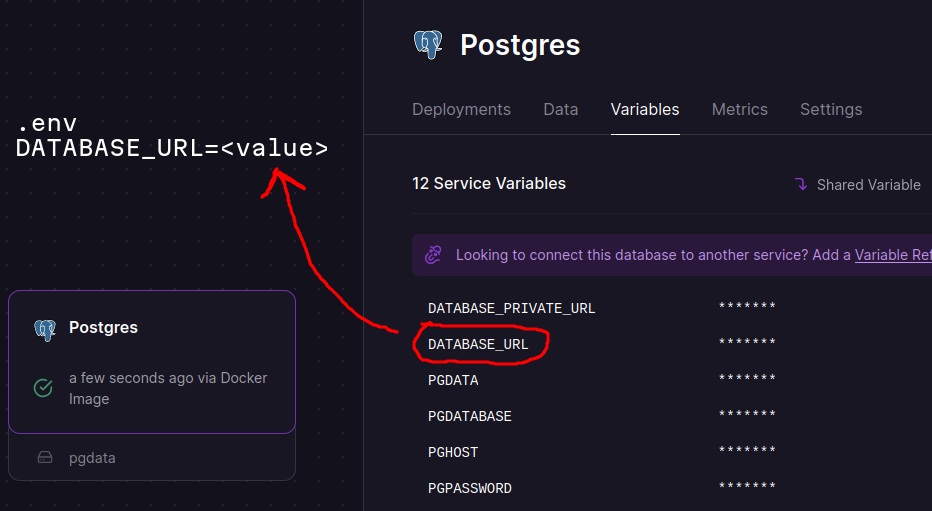
- …which we will add to a new
.envfile in our root directory.
# .env
DATABASE_URL=postgresql://<username>:<password>@<location>:<port>/<dbname>- Moving on, we now need to define the shape of our data in our
schema.tsfile using Drizzle:
// schema.ts
// ---------------------------------------
/* Import packages (installed via npm/pnpm) */
// drizzle-orm packages
import { relations } from "drizzle-orm";
import { pgTable, serial, timestamp, varchar } from "drizzle-orm/pg-core";
// ---------------------------------------
/* Data Models */
// >> find more information on defining the schema:
// >> https://orm.drizzle.team/docs/sql-schema-declaration
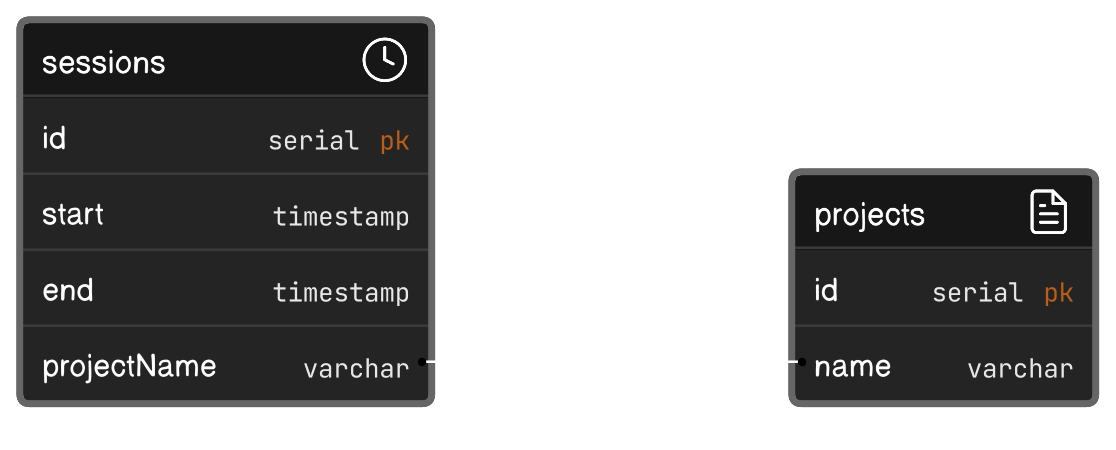
export const projects = pgTable("projects", {
id: serial("id").primaryKey(),
name: varchar("name", { length: 100 }).unique()
});
export const sessions = pgTable("sessions", {
id: serial("id").primaryKey(),
start: timestamp("start").defaultNow(),
end: timestamp("end"),
projectName: varchar("project_name").notNull()
});
/* Relationships Between Models */
// find more information on declaring relations:
// https://orm.drizzle.team/docs/rqb#declaring-relations
export const projects_relations = relations(projects, ({ many }) => ({
sessions: many(sessions)
}));
export const sessions_relations = relations(sessions, ({ one }) => ({
project: one(projects, {
fields: [sessions.projectName],
references: [projects.name]
})
}));
// ---------------------------------------This schema will create a one-to-many relationship where a project can have multiple sessions. Visually it’ll look like so, thanks to DiagramGPT:
- To turn this schema into our database’s tables, we need to create a
drizzle.config.tsfile in the root directory to setup the migration correctly, giving it the schema file, the folder that will hold the migrations, and theDATABASE_URLas the connection string to the database.
// ---------------------------------------

/* Import packages (installed via npm/pnpm) */

// to type check the configuration
import type { Config } from "drizzle-kit";

// load .env variables
import * as dotenv from "dotenv";
dotenv.config();

// ---------------------------------------

/* declare Drizzle config */
export default {
  schema: "./src/schema.ts",
  out: "./drizzle",
  driver: "pg",
  dbCredentials: {
    connectionString: process.env.DATABASE_URL as string
  }
} satisfies Config

// ---------------------------------------- Once that is set, we need to generate a SQL migration file using the
generatescript we made earlier inside thepackage.jsonfile, then push the changes with themigratescript.
# scripts declared in 'package.json'

# runs 'drizzle-kit generate:pg'
pnpm run generate

# runs 'drizzle-kit push:pg'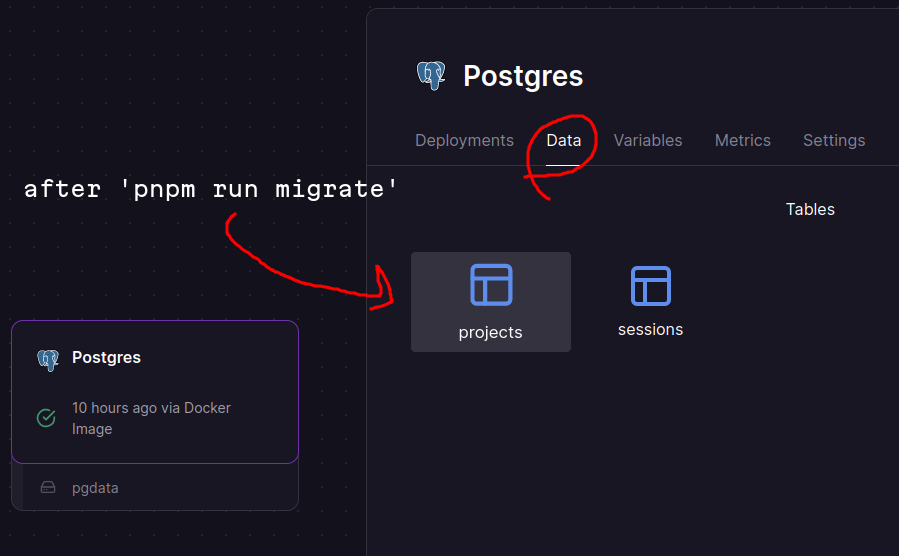
pnpm run migrate- Check your Railway deployment to see if the migration went through by ensuring our projects and sessions tables are in the postgres’ data tab.
- Finally, import the relevant packages and setup the Drizzle client ready for use in the next
// index.tsx
// ---------------------------------------

/* 🪂 Import pacakages (installed via npm/pnpm) */
// ...

// Database Driver
import { Pool } from "pg";

// Drizzle ORM packages
import * as schema from "./schema";
import { desc, eq } from "drizzle-orm";
import { drizzle } from "drizzle-orm/node-postgres";

// ---------------------------------------

/* 🏗️ Configure Hono Web Application */
// ...

// create pool connection to database
const pool = new Pool({
	connectionString: process.env.DATABASE_URL
});

// initialize ORM client with schema types
const database = drizzle(pool, { schema });

// ---------------------------------------
Implementing CRUD API with HTML Endpoints
Let’s implement the GET and POST HTTP endpoints to create and read projects to demonstrate how it’s written in Hono. Endpoints are made by calling the HTTP verbs’ function on the app variable, passing a string representing the path and an async function with the context as a parameter. Here, the context (c) is used to handle both the incoming Request and outgoing Response.
// index.tsx
// ---------------------------------------

/* 🛣️ Route Endpoints */
// ...

// GET: return project by name
app.get("/api/project/:name", async (c) => {
	// get route parameter (denoted with ':')
	const name = c.req.param("name") as string;

	// query database to find project with name
	const result = await database.query.projects.findFirst({
		where: eq(schema.projects.name, name)
	});

	// return JSON response
	return c.json({ result });
});

// POST: create new project with name
app.post("/api/project/:name", async (c) => {
	// get route parameter (denoted with ':')
	const name = c.req.param("name") as string;

	// create a new project
	const result = await database
		.insert(schema.projects)
		.values({ name })
		.returning();

	// return JSON response
	return c.json({ result: result[0] });
});
For this code snippet, the endpoints will run database queries and inserts with our Drizzle client based on the name given as part of the path and then return the results. We separate these functions with different HTTP verbs, even if they are under the same path/endpoint.
Now what are projects but holders of our sessions. Implementing these aren’t going to be as easy as our project endpoints since we need to ensure that all sessions started must end, as well as ensuring we are returning null if there is no latest session for the project.
// index.tsx
// ---------------------------------------

/* 🛣️ Route Endpoints */
// ...

// GET latest session under project name
app.get("/api/session/:name", async (c) => {
	const name = c.req.param("name") as string;

	// get latest session
	const latest = await database.query.sessions.findFirst({
		where: eq(schema.sessions.projectName, name),
		orderBy: [desc(schema.sessions.start)]
	});

	// return null if latest is undefined
	return c.json({ result: latest ?? null });
});

// POST create a new session under project name
app.post("/api/session/:name", async (c) => {
	const name = c.req.param("name") as string;

	// get latest session
	const latest = await database.query.sessions.findFirst({
		where: eq(schema.sessions.projectName, name),
		orderBy: [desc(schema.sessions.start)]
	});

	// if no session OR latest already has an end time, then create a new session
	// else end the current session
	if (!latest || latest.end !== null) {
		const result = await database
			.insert(schema.sessions)
			.values({ projectName: name })
			.returning();

		return c.json({ result: result[0] });
	}
	else {
		const updated = await database
			.update(schema.sessions)
			.set({ end: new Date })
			.where( eq(schema.sessions.id, latest.id) )
			.returning();

		return c.json({ result: updated[0] });
	}
});
Now we can test our application by running a local development (dev) server with pnpm run start in a terminal, and then using another to make curl requests. The following will make POST requests to create a project and session, GET the current session, and lastly POST to end the latest session. These should give you back JSON responses like those below on each request.
> curl -X POST http://localhost:3000/api/project/coding
{"result":{"id":1,"name":"coding"}}

> curl -X POST http://localhost:3000/api/session/coding
{"result":{"id":2,"start":"2023-10-29T22:43:25.588Z","end":null,"projectName":"coding"}}

> curl -X POST http://localhost:3000/api/session/coding
{"result":{"id":2,"start":"2023-10-29T22:43:25.588Z","end":"2023-10-29T22:44:17.350Z","projectName":"coding"}}%
Git & Github Repository Setup
We can easily deploy this application by putting this project in a repository on Github and then hosting it in our Railway project alongside our postgres database. Here’s the step by step (according to Notion AI):
- Create a new repository on GitHub.
- In your terminal, navigate to the root directory of your project.
- Initialize Git in the project folder by running the command:
git init. - Add all the files in your project to the Git repository by running the command:
git add .. - Commit the changes by running the command:
git commit -m "Initial commit". - Add the remote repository URL as the origin by running the command:
git remote add origin <remote_repository_url>. - Push the changes to the remote repository by running the command:
git push -u origin master. - Provide your GitHub username and password when prompted.
After following these steps, your project will be pushed to GitHub and will be visible in your repository.
Deploying the Node.js Web Application on Railway
From here, go back to the Railway project and press ‘Add’. Choose ‘Deploy from Github’ and find your repository. It should start deploying right away, but we need to change a few settings to get it working properly.
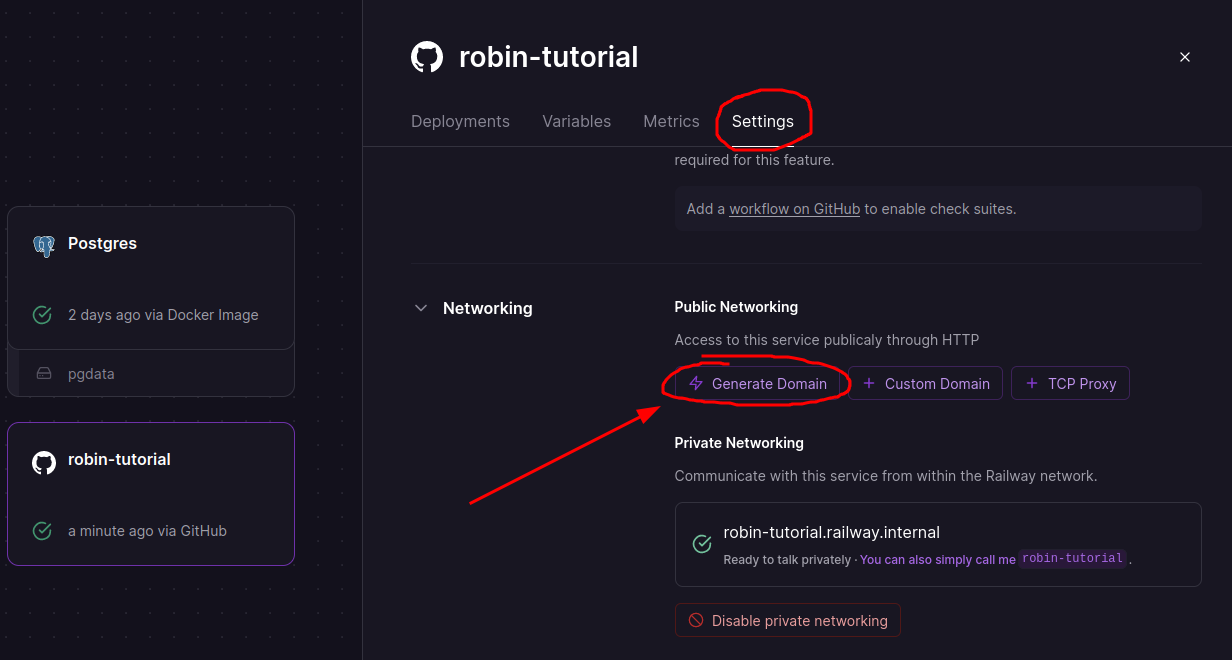
To connect to our website publicly, we want to go to service’s ‘Settings’, go down to ‘Networking’ and press the ‘Generate Domain’ button. This should give you a URL you can enter with your browser.
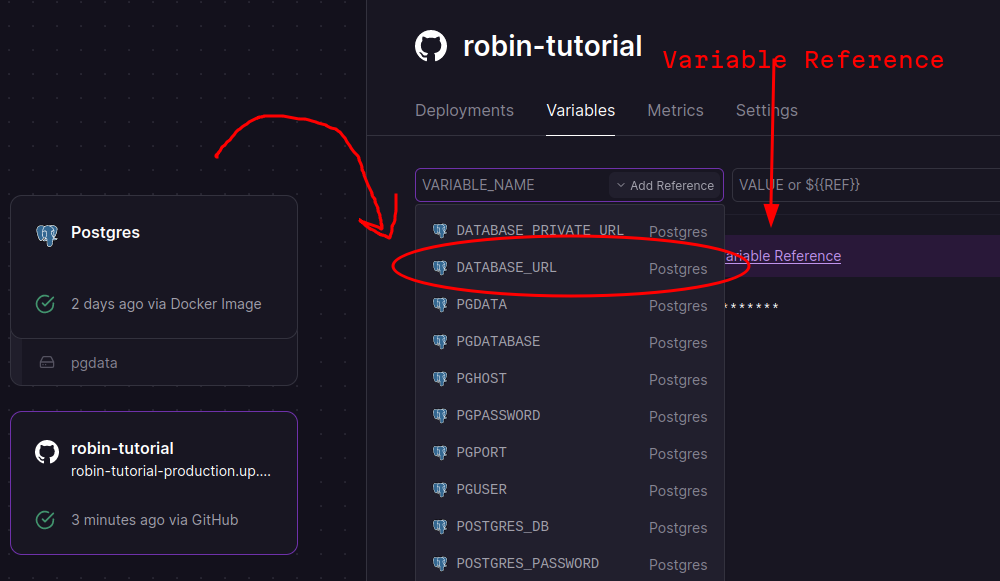
We also need to give the website access to our postgres database. Before we added the DATABASE_URL to a .env file, but since that isn’t in our repository (because it can be leaked on Github), Railway makes this easy for us by going to the ‘Variables’ tab and adding a ‘Variable Reference’, where we can add our DATABASE_URL variable from the database automatically.
And now the project is live online! No need to run a local server, you can now access your endpoint as long as you have internet connection. For example, you can run the same curl requests, but now with the live URL (note: use https , not http when using the live URL).
> curl -X POST https://robin-tutorial-production.up.railway.app/api/project/coding
{"result":{"id":1,"name":"coding"}}
That’s It…. FOR NOW
We now have a working CRUD web application online! Next steps is to get the TSX setup to use with a new blog on how to use HTMX. This will turn our application to an actual, honest to goodness, functional website, like with inputs, buttons, and styling! I’m working hard behind the scenes to learn how to implement HTMX and keep it understandable for you and me 😅
That’s in the future though! For now, I’d like to thank you for reading this blog. I very much appreciate it, and if you can do me a favor, take a look at the links down below. Catch you in the next one!
Shameless Plugs
- If you’d like to clone the source code for this project, it is public with a commented repository on my Github here.
- This project was made live on my Twitch stream. Code new projects with me weekly on twitch.tv/zeu_dev.
- Any comments or questions can reach me on Twitter. Follow me at twitter.com/zeu_dev.
- Interested on other stuff? Visit my personal website at zeu.dev and my other blogs on thoughts.zeu.dev!